Hey y'all ... this is a post mainly for my mom, but you may find it handy as well.
This is a tutorial on how to make a fabric box to cover another box.
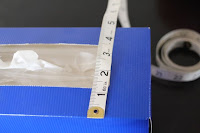
1.) Measure the box dimensions
Here - 9"wide(W) x 4.75"deep(D) x 4.25"high(H)


2.) Add your seam allowances to the measurements. I am using 1/4" seam allowances, so add 1/2" to all measurements (ie. 1/4" on both sides is 1/2" in total). Get it? Got it? Good!
Here - 9.5"W x 5.25"D x 4.75"H
3.) Iron your fabric and then cut your pieces.
Here -
Top (1 piece) => 9.5W x 5.25D (the beige colour)
Long Side (2 pieces) => 9.5W x 4.75H (the blue coloured ones)
Short Side (2 pieces) => 5.25D x 4.75W (the purple coloured ones)

4.) Sew the 4 side pieces to the top. So that it looks like the cross above but all sewn together. This is where you need to really pay attention....
When you sew the side pieces to the top, do not sew in the seam allowances. In other words, as my seam allowance is 1/4", start sewing the two pieces together 1/4" into the fabric and stop sewing 1/4" before the end of the fabric.
I personally like to use the markings on my sewing machine (or better yet, use a 1/4" foot!), but I've used some post-it notes here to show you what I mean and to show you how to use post-it notes as a guide.
Setting up the post-it notes


Sew the top to the side using your guides. Do not sew into the seam allowances.


Sew the next side to the top (the purple to the beige). Move the previously sewn side (the blue one) out of the seam allowance.
Do this for all 4 sides, making sure that you do not catch the previously sewn fabric in the next seam.
Still with me? Let's keep going because you're nearly there!
5.) Now, sew the sides together. Put the two side seams together (blue and purple) and move the top fabric out of the way (the beige one). To move it out of the way you end up folding it into a triangle. Again, start sewing 1/4" into the fabric. Better yet, try to find the start of the sewn seam (top-to-side seam) and start your side-to-side seam there. Sew all the way to through the bottom.


Repeat for all 4 sides.
Until your sides look like this...

I'm going to send this to my mom for the first cut and see if she can understand it. And then I'll make amendments after testing is out on her. Hold tight for now!!!
This is a tutorial on how to make a fabric box to cover another box.
1.) Measure the box dimensions
Here - 9"wide(W) x 4.75"deep(D) x 4.25"high(H)


2.) Add your seam allowances to the measurements. I am using 1/4" seam allowances, so add 1/2" to all measurements (ie. 1/4" on both sides is 1/2" in total). Get it? Got it? Good!
Here - 9.5"W x 5.25"D x 4.75"H
3.) Iron your fabric and then cut your pieces.
Here -
Top (1 piece) => 9.5W x 5.25D (the beige colour)
Long Side (2 pieces) => 9.5W x 4.75H (the blue coloured ones)
Short Side (2 pieces) => 5.25D x 4.75W (the purple coloured ones)

4.) Sew the 4 side pieces to the top. So that it looks like the cross above but all sewn together. This is where you need to really pay attention....
When you sew the side pieces to the top, do not sew in the seam allowances. In other words, as my seam allowance is 1/4", start sewing the two pieces together 1/4" into the fabric and stop sewing 1/4" before the end of the fabric.
I personally like to use the markings on my sewing machine (or better yet, use a 1/4" foot!), but I've used some post-it notes here to show you what I mean and to show you how to use post-it notes as a guide.
Setting up the post-it notes


Sew the top to the side using your guides. Do not sew into the seam allowances.


Sew the next side to the top (the purple to the beige). Move the previously sewn side (the blue one) out of the seam allowance.
 |
| Make sure the previously sewn side (the blue) is out of the way |
 |
| Sew the side to the top again avoiding sewing in the seam allowance. |
 |
| Notice how the blue side has not been touched on the right seam allowance? |
 |
| Both sides (blue and purple) sewn to the top fabric (beige) but are not sewn to each other. |
 |
| The starting point for the seam is 1/4" down into the fabric |
Still with me? Let's keep going because you're nearly there!
5.) Now, sew the sides together. Put the two side seams together (blue and purple) and move the top fabric out of the way (the beige one). To move it out of the way you end up folding it into a triangle. Again, start sewing 1/4" into the fabric. Better yet, try to find the start of the sewn seam (top-to-side seam) and start your side-to-side seam there. Sew all the way to through the bottom.


Repeat for all 4 sides.
Until your sides look like this...

I'm going to send this to my mom for the first cut and see if she can understand it. And then I'll make amendments after testing is out on her. Hold tight for now!!!
Comments
Post a Comment