
Last minute Advent Calendar


I was really against Advent Calendars before.  I just didn't understand how they fit in the spirit of Christmas.  


 And then, one day a thoughtful friend (thanks P!) sent me this link which made me rethink the spirit of the Advent calendar and inspired me to make not one, not two but three Advent Activity calendars  (one for Little Miss M and one each for her two cousins)!!  


 Unfortunately, I didn't get this lightbulb inspiration until the 2nd of December, which was the same day that my Baby Mac was not feeling too great.  

So, from none to three, in the space of one late evening, here are my super quick, super simple, Advent Calendars.


Want to know how to make them?  Then read on!

You'll need
- brown crafting or wrapping paper.  I got mine from Woolworths.
- ribbon tied into bows
- some Christmas stamps or stickers (something to decorate about 5 or 6 brown packets)
- a pen/texta to write the numbers (or you can stamp them if you have the stamps)
- a sewing machine (the tool that makes it super quick and super simple)
- a glue (strong enough to glue the ribbon to the packet as well as gluing paper together)
- chocolate (or your treat to put into the packet)
- an activity for each day of December leading up to Christmas (optional)

Note : this being a super quick project, there is no real accuracy required.

1.  Cut out the required number of rectangles from the brown paper measuring 15cm x 13cm.


2.  Number each paper and decorate say one in five (or more if you wish) with a Christmas sticker or stamp.


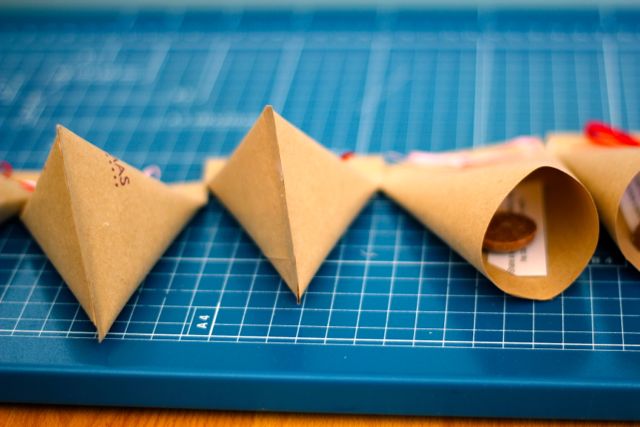
3.  For each piece of paper, roll up the shorter sides together and glue it together to make a tube.

Like decorated toilet rolls!

4.  Making sure that the number or Christmas sticker/stamp is facing you, pinch the top of the tube so that it is flat at the top only (~1cm - 1.5cm) and then fold down.  Eg - in an East to West fold across the top of the tube.  The photos below should help!

Pinch together

Fold the top down - about 1 - 1.5 cm

Notice how it is still tube shaped at the bottom

5.  Do this for all of the papers.


6.  Lay them out near your sewing machine in number order.  

Yes - that is a portable bassinet.  Perfect height!!
7.  Sew across the flat tops of the packets in one continuous line.  Leave a 1-2 cm gap in between each packet.  I sewed in reverse number order - starting from 25 down to 1.  The back of the packet was facing up.


8.  Lay out the stringed Advent Calendar on a long flat surface.  Attach the ribbon bows and place your chocolates/treats (and activities, if you're doing them) in each packet.


9.  Put some glue on the bottom of each packet and pinch the tube in a North to South line.


10.  Hang and double check that all the bottoms are securely sealed.


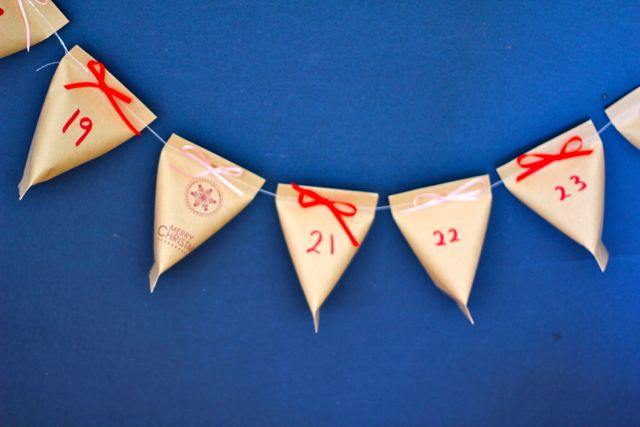
We hung ours on our tiny Christmas Tree.


For more fabulous ideas head on over to :
Marvelously Messy
So Very Creative
You're Talking Too Much 

Comments

Popular posts from this blog

To ice or not to ice?

That is the question... I have a new addiction (surprise, surprise!).  While I still favour Morning Tea and Afternoon Tea and all of its delights, I have recently been replacing the mandatory "tea and cake" with an Iced Tea or an Iced Coffee. These tea delights are so wonderfully refreshing on those hot summer days.  And it satisfies my "drink and sweet" craving in one shot - which saves me on baking time and calorie count (like I do that anyway!). Seriously, I could drink Iced Tea or Iced Coffee all day, but I have limited it to either Morning Tea or Afternoon Tea.  Got to keep it special!  (Hence the continued use of CAPITALS :) ). The best thing is that these drinks are so easy to make at home and, to my taste buds and stomach anyway, are a lot better than most of the ones that you can find in your local cafe.  I can control the strength, the milkiness, the sweetness to suit my picky palate. The other best thing is that I no longer feel the ...

It's a skill and I need more sleep

Do you tell jokes?  I don't.  Hardly ever anyway.  One - I don't know many jokes. Two - I can't tell jokes.   I stutter the punch lines which ruins it.  Or I'm laughing before I finish telling which, again, ruins it. And three - I have a really BAD sense of humour.    Only my husband gets it.   He gets my humour and reacts.   It's why I married him.     And yes, please note the purposeful use of "reacts" rather than "laugh" because ... yeah ... no ... he doesn't always laugh.  And the times when he does laugh he's usually not laughing at the joke; he's usually laughing at me.   But that's ok because that was the point of the joke - to make him laugh.  Which he does.  Why he's laughing ... well, that's secondary, isn't it? And what about pithy witty comments?   I'm full of them.   Clever, imaginative one-liners.  But, again, it's all in the...

The Hummingbird Bakery Cake Days Cupcakes

I have seriously tried to limit the number of cookbooks in my bookshelf.  Not only is the internet a major source of information (and free at that!), but we just don't have the space. However, there are a few cookbooks that I love having on hand, in person, ready to be flicked through at a moments notice.  And this book - the Hummingbird Bakery Cake Days - is fast becoming one of those books.  I love it even more so as it was a "just because" present from my Dear Husband :) The cover is textured and PINK.  Not just a pastel pretty pink, but a bright-in-your-face PINK!!  There's no mistaking the market for this cookbook.  And the rest of the book follows in its bold use of colors.  This cookbook, for me, provides inspiration by way of baking, photography, and food styling.  Much progress on the first one, not so much on the last two.. oh well, so let's talk about the baking. So far, I've tried two basic recipes - the vanilla cupcakes with van...